06 July 2017
Using plugins in Corona Native projects (iOS)
With the new unified Corona (Corona + Corona Native), some developers have asked how to include plugins in Corona Native projects. The process outlined here is for iOS only, but we plan to post similar instructions for Android Studio soon.
IMPORTANT: The process outlined herein requires daily build 2017.3103 or later.
Essentially, to use plugins with Corona Native builds through Xcode, you must include them in build.settings just like you would for Corona Simulator builds, for example:
|
1 2 3 4 5 6 7 8 9 10 |
settings = { plugins = { ["plugin.openssl"] = { publisherId = "com.coronalabs" }, }, } |
From here, you must run a process which contacts the Corona Marketplace and confirms that you have an active license for the plugin(s). If confirmed, Corona will install the library files and link them to your project.
Procedure
To perform the process described above, simply follow these steps:
- Open your project in Xcode.
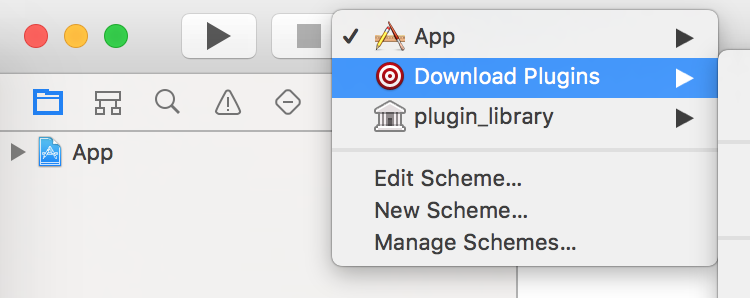
- In the Xcode tool bar, click on the active scheme button and select Download Plugins:

- Click on the Run button to download the plugin(s):

- In the Xcode tool bar, click on the active scheme button and select your main app.
Now you can build your app with any plugin in the Corona Marketplace. Note that you’ll need to download the plugin(s) each time you add or change plugin settings/inclusions within build.settings.
REMINDER: Unless you need access to specific native libraries, offline builds. or you are building native-based plugins, you can (and should) build and ship apps using the Corona Simulator and Corona Lua APIs. Essentially, while some specific tasks may require Corona Native, they should only be implemented by developers who have previous experience with native functionality.


Sorry, the comment form is closed at this time.